Configuring DNS for email: A quick beginner’s guide
Domain Name Servers tend to confuse a lot of people. If you are one of them, don’t feel bad.
I have had full-time IT professionals tell me that you can’t have email on a different server than your website and that is obviously not the case. That is the whole point in mail exchange records (MX), a type of DNS record.
Not everyone understands the ins and outs.
Related: DNS records — A beginner’s guide
How to configure DNS for email
In this article, we’ll cover:
Common types of DNS records.
How email messages are exchanged between servers.
Configuring email-specific DNS records.
Let’s dive in!
What is DNS?
DNS stands for Domain Name System or Domain Name Server. They’re responsible for connecting domain names to web servers. Anytime you connect to the internet and go anywhere, you’re using them.
Here is how it works:
Your browser: Go to godaddy.com. Your computer: Connect to DNS server and tell me which server godaddy.com is on. DNS server: godaddy.com is on this IP address: XX.XXX.XX.XXX Your browser: Go to this IP address and ask for the godaddy.com website.
The DNS records translate the domain into the IP address of the server that hosts it. So in this case, you asked for godaddy.com and it told you where it was hosted. (The web server is then responsible for loading the site that matches the requested domain, but that’s beyond what we’re covering here.)
For this article, we’ll be covering A Records, CNAME Records, MX Records and SPF/DKIM Records. I’ll be using your_company.com as the example domain.
What are CNAME and A records?
The CNAME and A Records are the most basic and common records. They are probably the easiest to explain.
‘A’ record: This tells you where the default domain is. Often the main domain is represented by an @ symbol. The @ symbol just means your_company.com.
‘CNAME’ record: Is an alias for something. In the case below, the CNAME is telling you that the “www” part of “your_company.com” is on the same server, which is represented by the @ symbol.
Here is a standard set up telling you that the “A record for your_company.com (also known as @) is on the server IP address of 192.168.1.1,” and the “CNAME of www is also pointing to the alias of @, which is 192.168.1.1.”

Do you need more information? Check out these links:
You also can find a wealth of information about different DNS records (also known as zone file records) and how to manage them in this GoDaddy help article.
What are mail exchange (MX) records?
MX records in the DNS server allow us to specify where email should be delivered. A GoDaddy help article about MX records states that “MX records specify and prioritize the incoming mail servers that receive email messages sent to your domain name.”
Adding MX records are the easiest part of this. If you are using a service like G Suite, your MX records should look something like:
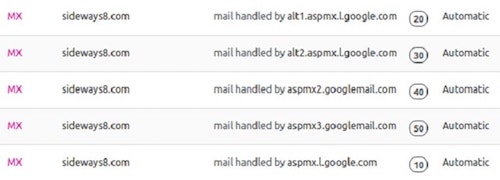
These records are just telling the sending email server, when sending an email to sideways8.com, deliver to aspmx.l.google.com (10). If that server doesn’t accept the email, then send it to alt1.aspmx.l.google.com (20), etc.
How is email sent and received?
Email became popular — go figure, right? As more email was being sent globally, more spam came in.
Here is an example of how email used to be sent and received:
Sending server: Hello, I have an email for bob@your_company.com. Receiving server: Great! Send it. Sending server: Here you go. Receiving server: I received it. Thanks.
Here is how the conversation goes now, and this is why email sent from you or your website might not make it into someone’s inbox:
Sending server: Hello, I have an email for bob@your_company.com Receiving server: your_company.com? Let me check DNS records. You do not have permission to send email on behalf of your_company.com. I’m rejecting you. Sending server: Ugh. I guess I need to fix my DNS so you will accept it.
Anyone can send an email acting like someone else. I could set up an email server on my laptop and send an email to bob@your_company.com saying that I’m larry@your_company.com.
If your_company.com’s mail server doesn’t have some way of checking, it will be accepted.
Concerning your website, sending email from a web server used to be easy. You would build a very simple form and specify which email address it should go to and — boom! The email shows up on the mail server specified by the receiving domain’s MX record.
The issue is that spam became popular, and spam filters started to pop up to stop it.
Related: How to check DNS and diagnose common issues and How to avoid sending spammy emails
Why should you care?
If you are a small business owner and you are sending email to contactus@your_company.com through a “contact us” form on your website, you should care. You need these to make it to your_company.com. This is true for any form on your website. You need the mail to be delivered.
If the DNS records aren’t there, emails are far less likely to make it from your contact form to your company email address.
This is also true for general email delivery, like person-to-person email. Mail servers are going to check and see if you are allowed to send and receive based on the DNS records. If the records aren’t present, the emails are far less likely to make it through.
What is blocking the mail from being delivered?
Spam filters are designed to detect illegitimate email and they use these technologies to filter out spam:
SPF: Sender Policy Framework
DKIM” DomainKeys Identified Mail
DMARC: Domain-based Message Authentication, Reporting and Conformance
These all have corresponding DNS records that must be configured.
I’m going to simplify my explanation to a certain extent, but here is what each one of those are asking:
SPF asks, “Is this IP address allowed to send mail on behalf your_company?”
There are three responses: Accept, Reject, and Accept but send to spam.
You need a record for any service that sends email on your_company.com’s behalf. For example, if you are using MailChimp, you will need to add records to cover it.
DKIM asks, “Can I check your digital signature? I need to check the signature against the sending server.”
One of the best explanation of DKIM comes from emailonacid.com: A sender creates the DKIM by “signing” the email with a digital signature. This “signature” is located in the message’s header. The sending mail transfer agent (MTA) generates the signature by using an algorithm applied to the content of the signed fields. This algorithm creates a unique string of characters, or a “hash value.”
DMARC asks, “Did SPF and DKIM pass? Let’s run through our policies that tell us what to do if the email is accepted or rejected.”
Putting it all together
With those basics out of the way, let’s look at configuring DNS for email.
Setting up MX records
Each mail provider will be able to provide these settings, but here are a couple of popular ones:
You just need to follow the instructions and make the records look similar to my example mentioned earlier. My examples include G Suite, because that’s what my company uses.
If you are using something else, make sure you are grabbing the correct information from the correct provider.
Making spam filters happy
Unlike A Records and MX Records, DKIM and SPF do not have their own prefix or type of record. They use TXT records. When adding them, you will select TXT and then within the value you will specify which type. GoDaddy has this article about adding a SPF record.
Adding SPF records
For my domain, this is what a plain SPF record looks like:

“v=spf1 mx -all” allows the domain to send mail from the specified MX records for the domain only, prohibit all others. For example, if your email service is G Suite, then this will allow email from Google’s servers to send, but no other servers would be able to.
If I need to send email through our project managing software (Teamwork), I need to let the DNS records show that it has permission to do so:

If you you need to also send mail through your CRM, AWS SES, SendGrid, or some other service that you use, you will have to add those records. Your SPF Record could look like this:
v=spf1 a mx include:teamworkdesk.com include:spf.mandrillapp.com ~all
Just add another “include:service_name.com” to the same record. To be safe, always read the instructions for the service you are using.
Adding DKIM records
Now that you have your SPF records, you might need to add a DKIM record. It should be pretty simple; find the service and you will want to copy and paste your DKIM record from the service.
MailChimp (Mandrill) services DKIM looks like this:

Note: The DKIM record is a whopping 216 characters (hence the ellipses in the screenshot). You should be able to have a seperate DKIM for each service (as opposed to SPF records, that combines the domains).
What if email from your website isn’t being received?
There are a few factors involved in the situation. It could be that your domain has been blocklisted. You can test by going to MX Toolbox. If that isn’t the case, I recommend using a transactional email service like SendGrid. We install SendGrid on most websites we work with because we know how important it is to make sure mail is delivered.
DNS can be complex. Hopefully this will help you get you started.
If you’re thinking about becoming a DNS expert, I recommend reading DNS and Bind (5th Edition). That was a great resource when I was learning the ins and outs of DNS. Adding MX records to GoDaddy
These instructions are for users who purchased their domain on GoDaddy and would like to change their mail records (MX) so they can send and receive mail with Fastmail.
Changing your MX records is the best option for users who have a website on their domain hosted with another service. For users who do not have a website hosted at their domain, switching nameservers is usually a better option.
This guide covers three steps to setting up your domain:
Advanced instructions for setting up MX records can be found here.
1. Add your domain to Fastmail
We have a setup guide to help you get your domain working as quickly and easily as possible.
After you have purchased your domain from GoDaddy, log in to Fastmail and go to the Settings → Domains screen.
Add your domain(s) (e.g. mydomain.com). Using the Add Domain button brings up the new domain screen. Type your domain into the text box.
If your domain has been purchased from GoDaddy, we will display this on the next screen. You can also choose GoDaddy from our list of supported registrars.
Follow the wizard to add your email addresses to Fastmail. To have the wizard provide you with steps to update your MX records by default, choose Yes when you are asked if you have a website.
Please note: The domain setup wizard can only set up aliases on legacy plans. If you are on a legacy plan, you will need to add users manually in order to create additional user accounts at your custom domain.
2. Edit your MX records in GoDaddy
Note: We recommend making these changes at a time that you do not expect much mail to be sent to your domain
Log in to your account at GoDaddy.
In the Domain List on your account, find the domain you want to use with Fastmail, and click Manage:

Scroll down until you see Additional Settings and click Manage DNS:

In Records, select Add:

For the record type, select MX and list the details as follows:
Host
Value
Priority
@
in1-smtp.messagingengine.com
10
Then click Save.
Click Add New Record, and add a second MX record with the following details:
Host
Value
Priority
@
in2-smtp.messagingengine.com
20
Click Save All Changes. When you are finished, your records should look like this:

You should now have two MX records, in1-smtp.messagingengine.com and in2-smtp.messagingengine.com.
3. Signing your domain
Your domain should now be ready to receive messages. In order to make sure your sent messages reach your recipients, there are a couple more records to add in your GoDaddy account.
Scroll up to Host Records in your GoDaddy domain panel and click Add New Record. Add three new records, all with the type
CNAMEand the following information (make sure to replacemydomain.comwith your actual domain name):
Type
Host
Value
CNAME
fm1._domainkey
fm1.{mydomain.com}.dkim.fmhosted.com
CNAME
fm2._domainkey
fm2.{mydomain.com}.dkim.fmhosted.com
CNAME
fm3._domainkey
fm3.{mydomain.com}.dkim.fmhosted.com
You can leave any other CNAME records you have for your domain where they are.
When you are finished, it should look like this (with your actual domain name in place of yourdomain.com)

Add one final new record, in the same place you added your CNAME records. In the drop down for the record type, choose
TXT, then enter the following information:
Type
Selector
Value
TXT
@
v=spf1 include:spf.messagingengine.com ?all
When you are finished, it should look like this:

Once you have finished this step, your domain should be working with Fastmail.
To check all your settings are correct, log in to your Fastmail account and go to the Settings → Domains screen. Click Recheck DNS. Your domain should now say Active. MX records set.
Last updated